

-How to Use SpreadJS Designer and Troubleshoot Bugs-
Introduction
I first encountered the SpreadJS library when I was assigned to a project. The library was used to enable Excel files to be viewed and edited on the screen, and I have organized here the issues I encountered while applying it. These included a bug in which the sidebar and binding paths disappeared when refreshing or importing, as well as features added to meet customer requirements: preventing sheets from being added and preventing cells from being deleted. Both issues ultimately required an understanding of SpreadJS Designer's command system. As a result, this was an experience in which I had to analyze undocumented areas myself to implement the requirements.
The Sidebar and Binding Paths Disappear When Refreshing or Requerying
When the template was first loaded, the binding path tree was displayed normally in the sidebar along with the Excel screen. However, when I clicked the refresh button or reopened the file, the binding paths no longer appeared in the Excel screen, and the sidebar also disappeared. The initial load succeeded, the first refresh failed, and the second refresh succeeded again. It followed a pattern in which odd- and even-numbered attempts alternated exactly.
Cause: Checkbox-Type Commands Toggle Their State Each Time They Are Called
The function that draws the sidebar was workbook.open()called inside its success callback. When I logged the Designer.getCommand(TEMPLATE_DESIGN_MODE) object retrieved with command to the console, it contained the following field.
{
  "commandName": "templateDesignMode",
  "type": "checkbox"
}
"type": "checkbox"This was the key. Checkbox-type commands in SpreadJS Designer are designed to toggle their on/off state each time they are called, like the Bold and Italic buttons on the ribbon. Since this command was being executed every time the data was loaded, the following sequence was actually repeating.
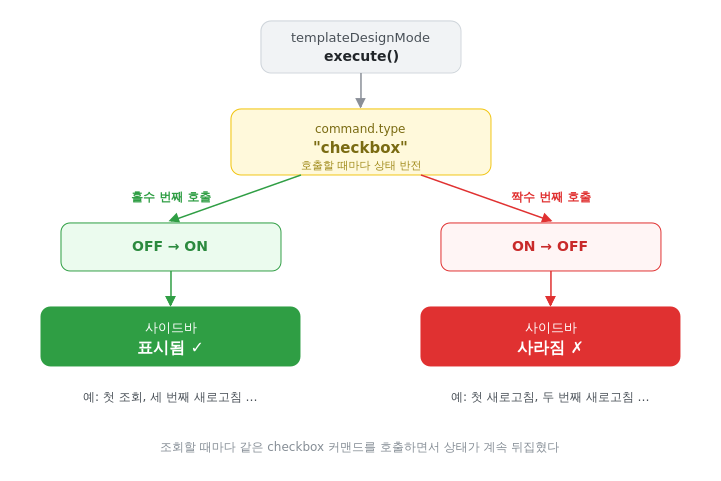
The bug was precisely dependent on "which invocation this command was on," regardless of the refresh button itself. At first, I suspected a rendering timing issue and tried adjusting setTimeout and suspendPaint/resumePaint first, but they had nothing to do with the cause. The fact that the symptoms were divided exactly between odd and even attempts was itself a clue that "a state value was involved," but I regret that I did not recognize that signal immediately.
Solution
Before executing the command, I first checked its current state and skipped execution if it was already enabled.
return (designer) => {
  const isAlreadyOn = command.getState?.(designer);
  if (isAlreadyOn) return;
  return execute(designer);
};
Customer Requirements: Preventing Sheet Addition and Deletion of Bound Cells
While I was nearing completion of the feature, the customer sent three additional requirements.
1. Prevent sheets from being added on the template configuration screen (+ by removing the button or using another method)
2. Prevent cells with binding paths from being deleted. These cell values were going to be used as-is on another screen, so they must not be removed. However, all other cells without binding paths should remain freely editable as they are now. Only "deletion" needs to be blocked.
3. Whenever the sheet is switched, reflect the binding paths in that sheet in the sidebar's field list.
Refreshing the Sidebar When Switching Sheets
Requirement 3 was solved relatively easily using the ActiveSheetChanged event. Whenever the sheet changes, I re-extract or remap the binding paths according to the current mode—whether it is file import mode or existing database query mode—and then call the function that redraws the sidebar tree.
workbook.bind(Events.ActiveSheetChanged, function (sender, args) {
  const currentSheet = args.newSheet;
  if (!currentSheet) return;
  const sheetName = currentSheet.name();

  if (isImport) {
    const bindingPathsFromSheet = extractBindingPathsFromSheet(currentSheet);
    void setBindingPathToData(currentDesigner, currentWorkbook, bindingPathsFromSheet);
  } else {
    const currentSheetDatas = fieldsBySheetMap?.get(sheetName) || [];
    void setBindingPathToData(currentDesigner, currentWorkbook, currentSheetDatas);
  }
});
For requirements 1 and 2, I had to completely revise my approach about three times before finding the proper solution.
Approach 1. Cell Locking
I first tried locking only the cells with binding paths, leaving the rest editable, and then enabling sheet protection.
const unlockedStyle = new GC.Spread.Sheets.Style();
unlockedStyle.locked = false;
sheet.setDefaultStyle(unlockedStyle);

for (let r = 0; r < sheet.getRowCount(); r++) {
  for (let c = 0; c < sheet.getColumnCount(); c++) {
    if (sheet.getBindingPath(r, c)) {
      sheet.getCell(r, c).locked(true);
    }
  }
}
sheet.options.isProtected = true;
When I actually applied it, even cells without binding paths could no longer be edited at all. The result was the same whether I used setDefaultStyle or forcibly overwrote the entire range. When I checked the console, I also found that locking itself was not enabled even in the default state. I was unable to clearly identify the cause to the end, but I suspect that a separate protection option, not immediately detectable through code, may already have been configured in the template (.sjs) file itself. Regardless of the cause, the sheet protection feature was fundamentally a poor match for the requirement that "unbound cells must remain completely freely editable, while only deletion should be blocked."
Approach 2. Command Override
I tried making use of the command system I had learned about while solving the checkbox-type command issue. Assuming that deletion would also have a command with a name, I searched for a command named deleteRows using commandManager().getCommand() and overrode it by saving the original and then conditionally blocking it.
const originalDeleteRows = commandManager.getCommand('deleteRows');
commandManager.register('deleteRows', {
  canUndo: originalDeleteRows.canUndo,
  execute: (context, options, isUndo) => {
    // 대상 행에 바인딩패스가 있으면 차단하는 로직
    return originalDeleteRows.execute(context, options, isUndo);
  }
}, false, false, false, false);
However, even when I clicked Delete Row/Column in the right-click menu, the overridden execute was not actually invoked. Although I was unable to verify the exact reason in the official forum, as we saw earlier with the checkbox command, Designer connects actions using its own commandMap system, whether for the ribbon or the right-click menu. This suggests that clicking "Delete Row" in the right-click menu is not simply calling the named command registered with commandManager, but is being handled through a separate path inside Designer. In other words, although they appear to be the same kind of "delete" on the surface, the Delete key (→ a clear-type command) and row/column deletion in the right-click menu were taking different paths. I concluded that pursuing the command itself had limitations and changed my approach.
Approach 3. Controlling the Context Menu
Instead of trying to block command execution, I changed direction, thinking that perhaps I could simply disable the one "Delete" item in the right-click menu whenever it opened. I narrowed the question down to "What event is called whenever the menu opens via right-click?" and found contextMenu.onOpenMenu.
However, when I attached it as-is, the callback was called normally, but itemsDataForShown(the list of menu items that would actually be displayed) was continuously logged as an empty array. Since Designer manages the ribbon and right-click menu through its own commandMap system, it appeared that attaching it only to the plain workbook's contextMenu was not enough to capture the items that Designer actually renders. After reorganizing the code to save the original onOpenMenu in advance and wrap it, the items were passed through normally.
workbook.contextMenu.onOpenMenu = function (menuData, itemsDataForShown, hitInfo, spread) {
  let result = true;
  if (typeof originalOnOpenMenu === 'function') {
    result = originalOnOpenMenu.apply(this, arguments);
  }
  const sheet = spread.getActiveSheet();
  const info = hitInfo.worksheetHitInfo;

  if (!info || hitInfo.hitTestType == null) {
    // 시트 탭 영역: insertSheet 항목 비활성화
    itemsDataForShown?.forEach((item) => {
      if (item.name === 'insertSheet') item.disable = item.disabled = true;
    });
  } else if (info.row >= 0 && info.col >= 0 && sheet.getBindingPath(info.row, info.col)) {
    // 셀 영역: 바인딩패스가 있으면 delete 관련 항목 비활성화
    itemsDataForShown?.forEach((item) => {
      const name = item.name?.toLowerCase() ?? '';
      const text = item.text?.toLowerCase() ?? '';
      if (name.includes('delete') || text.includes('delete')) item.disable = item.disabled = true;
    });
  }
  return result;
};
With this logic, I disabled the sheet tab's insertSheet and the cell's delete items separately, satisfying both requirements. The ribbon's + button was hidden from the screen entirely with a single option, workbook.options.newTabVisible = false; independently of this override. In other words, the path for adding a new sheet via right-click was blocked with onOpenMenu, while the button itself was disabled with this option.
Conclusion
What I learned from this work is that SpreadJS Designer often cannot be handled simply by looking at the general SpreadJS Workbook API. Because the ribbon, Context Menu, and Command are connected as a single system, the fastest way to debug when something gets stuck was to first inspect the related command objects. This experience helped me understand Designer's internal structure a little better, beyond simply using its APIs.
pong